A: Design of single guide RNA sequence for CRISPR gene knockout

General considerations: To avoid artifact issues due to non-specific targeting it is recommended to pick at least 3-5 independent “single guide RNA” (sgRNA) sequences for each gene of interest or non-targeting control. Once the knockout efficiency is verified, choose the best 2-3 gRNA knockout cell lines that will be used to study the knockout of your gene of interest. Note: If non-specific targeting seems to cause issues in your system, the non-specific genes targeted can be determined via their sequence similarity. Simply enter the target sequence on Nucleotide Blast to find genes with similar sequences:

  1. For general overview of the CRISPR technology addgene.org provides a comprehensive introduction guide: https://www.addgene.org/guides/crispr/
  2. Search existing publications that already used CRISPR and verified knockout of your specific gene of interest either by PCR or by immunoblotting. If this is not available, try one of the following strategies.
  3. Use existing CRISPR knockout libraries that were published to select targeting sequences. The laboratory of Michael Bassik in Stanford has published whole-genome CRISPR-Cas9 knockout libraries for targeting human or mouse, containing 10 variable length guides per gene. If you use this strategy please see Morgens et al., 2017 and use this paper for reference:
    • Human whole-genome CRISPR knockout library sequences Excel file can be found in “Supplementary Data 1”.
    • Mouse whole-genome CRISPR knockout library sequences Excel file can be found in “Supplementary Data 2”.
  4. Use web tools to find gRNA target sequence.
    • Enter the gene name or gene ID in the web tool “CHOPCHOP”. CHOPCHOP (version 3) is a web tool for selecting target sites for CRISPR/Cas9, CRISPR/Cpf1, CRISPR/Cas13 or NICKASE/TALEN-directed mutagenesis. Use link: https://chopchop.cbu.uib.no/
    • Enter gene ID or raw DNA sequence to find target sequence for your gene of interest. This tool ranks and picks candidate CRISPR knockout sgRNA sequences for the targets provided, while attempting to maximize on-target activity and minimize off-target activity. For more information about inputs and outputs as well as referencing, see: https://portals.broadinstitute.org/gpp/public/analysis-tools/sgrna-design


Note: 5 considerations for target site selection. Knockout libraries often target 5′ constitutively expressed exons, but activation and repression libraries will target promoter or enhancer regions. For gene knockout it is recommended to choose early constitutively expressed exons but try to avoid the first exon if not possible otherwise. IDT Integrated DNA Technology provides a detailed summary of considerations. Here in short:

  • If your gene of interest expresses multiple transcripts limit the target site to exons that are shared between variants. Use Ensemble (or other genome databases) to determine important functional domains within the gene and whether various transcripts are expressed.
  • Check if there are SNPs present in your target site and avoid this target site.
  • Determine the ploidy of your cells as the presence of multiple alleles may lead to increased number of editing events.
  • Check known phenotypes of your gene in order to not misinterpret errors in methodology with lethal, proliferative or differentiation phenotypes due to gene knockout.
  • Check editing efficiency with your polyclonal population first before selecting monoclonal populations for specific editing events.


B: Cloning sgRNA encoding DNA sequence to plasmid system of interest


Required materials:

General considerations: Choose the plasmid system depending on the characteristics of the target cells. Either use a 1-plasmid system that includes the Cas9 on the sgRNA-containing plasmid, or a 2-plasmid system in which Cas9 must be delivered separately. Due to the large size of Cas9 (4.1 kbp) and depending on the characteristics of the target cell type it may be better to use the 2-plasmid systems over a 1-plasmid system due to the fact that lentiviral titers decrease with increased size of inserts. This becomes important for difficult-to-infect cells such as primary cells, while 1-plasmid systems are more convenient for easy-to-infect cells as it also reduces the number of selection markers being integrated. There are several plasmid systems available from addgene.org as described in the section “Select expression system” of the CRISPR guide.

A variety of different 1- or 2-plasmid systems for expression in a variety of species are available on addgene.org. Information and availability of empty CRISPR plasmids can be found here.


Plasmid systems:

  • Addgene 85402: Lenti-multi-CRISPR-puro (Figure 1), published by Cao J. et al., 2016, is a system that allows delivery of Cas9 together with 1 or up to 5 different sgRNA’s constitutively expressed from one plasmid using puromycin resistance as a mammalian cell selection marker. Important note: If more than 1 sgRNA will be inserted it is required to design primers as outlined in Figure 2 and described in detail in Cao J. et al., 2016. This protocol uses HD In-Fusion cloning system from TakaraBio that uses homology directed recombination approach, which does not require restriction enzyme digest step (as shown in Figure 2) to produce sticky overhangs of the multiple inserts. Instead, the multiple insert fragments require 15-20bp homology overhangs at the 5’ and 3’ end that are shared between the specific inserts to be cloned as shown for single sgRNA cloning in Figure 3. Please read the manufacturer user manual for detail instructions on primer design.
  • Addgene 98291: lentiCRISPRv2-hygro allows delivery of sgRNA and Cas9 constitutively expressed from one plasmid with Hygromycin B resistance as a selection marker for mammalian cells. Same cloning strategy can be used.
  • See Cao et al. Figure 2 for a schematic guide of the Lenti-muli Crispr plasmid (Fig 2A) and an overview of the cloning strategy for multiple sgRNA's (Fig. 2B).

Schematic overview of DNA oligo design and cloning reaction for single sgRNA cloning

Detailed cloning protocol:

  1. Design sense and antisense ssDNA oligonucleotides as indicated in Figure 1 from the manufacturer of your preference, according to the following instructions: DNA oligo’s were designed with the following vector/insert homology flanking sequences (5’-aaaggacgaaacaccN1-N19gttttagagctagaa-3’) containing the respective targeting guide RNA (sgRNA; N1-N27) sequence. IF DNA oligos are ordered as annealed dsOligo skip step 2. NOTE: The vectors suggested here are all compatible with the cloning strategy presented in this protocol. If different with cloning sites other than BsmBI (Esp3I), simply adapt the sequence of the vector-insert homology regions as described in Figure 1.
  1. Generate dsOligo’s from the ordered ssOligo’s with the following annealing reaction (if not ordered annealed as dsOligo already): Reconstitute sense and antisense Oligo’s at 10μm and anneal in a reaction using 10μl of each DNA oligo, 10μl NaCl (5M) and 10μl nuclease-free ddH2O for 10min at 95°C followed by decreasing 1°C/min for 70 cycles until 25°C is reached using a thermal cycler. Annealed dsOligo were then diluted 1/50 in ddH2O and 0.5μl was used per 50ng of digested vector in a cloning reaction.
  2. Perform restriction enzyme digest of 3-5μg CRISPR vector (lenti-multi CRISPR-puro or lentiCRISPRv2-hygro) for 15min with ANZA Fast-Digest BsmBI (Esp3I) and purify using a DNA Gel/PCR cleanup kit of your choice. Determine DNA concentration on a NanoDrop. NOTE: Using FastDigest restriction enzyme from ThermoFisher or any other manufacturer of your choice allow digest in 15-30min instead of overnight.
  3. Set up cloning reaction mix using the In-Fusion® HD cloning plus from TakaraBio, incubate for 15min at 50°C and allow to cool to room temperature before proceeding. Important: Include a control without adding insert or alternatively to safe In-Fusion HD enzyme just add same amount of linearized vector directly to the transformation reaction in step 5.


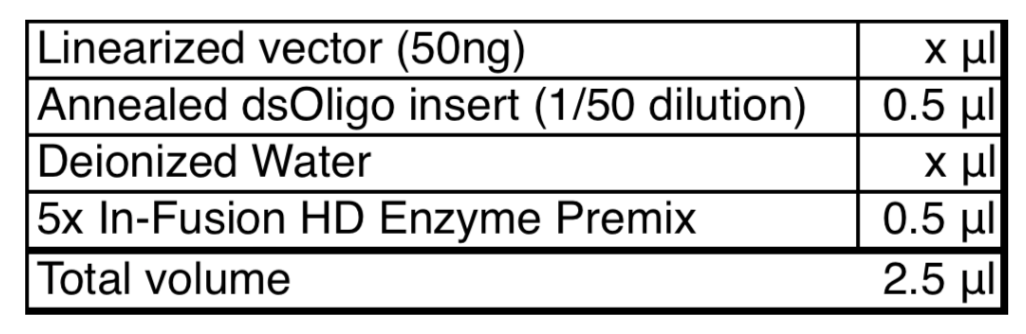
NOTE: The reaction mix can been downscaled 4-5x from the manufacture’s recommendations in order to save In-Fusion HD Enzyme Premix. If the concentration of the linearized vector is too low it needs to be upscaled accordingly. If recovery of linearized plasmid is too low from the PCR/Gel cleanup, try to improve recovery by multiple elution steps (see your manufacture’s recommendations) or upscale initial amount of vector for digest.

5. Transformation of competent bacteria using Stellar™ competent cells. Make sure bacteria are thawed on ice 10-15min before using. Transfer 50μl of bacteria into a pre-cooled 14ml round-bottom tube (Falcon tube; Corning 352059), add 2.5μl of the In-Fusion cloning reaction and place on ice for 30min. NOTE: Stellar™ competent cells are recommended and delivered with the In-Fusion HD cloning kit, however other competent bacteria strains can be used alternatively.

6. Heat shock the cells for exactly 45 sec at 42°C and place back on ice for 1-2min.

7. Add 450μl of pre-warmed (37°C) SOC medium to make a total volume of 500μl and incubate with shaking (160-225 rpm) for 1h at 37°C.

8. Transfer 1/5 – 1/3 of each transformation into a separate microfuge tube and after spinning at 6000 rpm for 5 min reconstitute with 100 μl fresh SOC medium and plate on a 37°C pre-warmed LB-agar plate containing 100 μg/ml of ampicillin. Incubate plates at 37°C overnight.

9. The next day, pick 3-5 single colonies from each plate and set up a 3-5ml liquid LB culture overnight at 37°C to isolate DNA the next day via your standard method of choice (e.g. Miniprep/Midiprep). To determine the presence of inserts, analyze the DNA by restriction enzyme digest, PCR screening or preferentially sequence the insert (use U6 forward primer).

10. Expected results:

  • The negative control plate (linearized vector only) should have few colonies in comparison. If many colonies are observed this is indicative of incomplete vector digest
  • If the expected results are not obtained, use the guide in Section X of the In-Fusion HD user manual to troubleshoot your experiment.Once positive clones are confirmed proceed to produce lentivirus and generate sgRNA/Cas9 mediated stable gene knockout cell lines either using your standard method of choice or proceed as outlined below.

11. Once positive clones are confirmed proceed to produce lentivirus and generate sgRNA/Cas9 mediated stable gene knockout cell lines either using your standard method of choice or proceed as outlined below.

C: Lentivirus production

  1. Seed LentiX293T (TakaraBio) into a 10cm dish to be 70-80% confluent the next day in a volume of 8ml of complete media using standard tissue culture methods.
  2. Prepare transfection reaction by adding envelope vector pVSV-G (1μg), packaging vector pSPAX2 (2μg) and integrating vector lentiCRISPRv2/gRNA (2.5μg) in 700 μl of OPTI-MEM and vortex.
  3. Add 16.5μl polyethylenimine 25kDa (PEI; Polysciences #23966-2) transfection reagent from a 1μg/μl stock solution and vortex.
  4. Incubate 15 min at room temperature and add dropwise to a 10cm plate with LentiX293T cells.
  5. Incubate at least 8h to overnight before carefully replacing fresh complete media.
  6. Lentivirus containing supernatant can be harvested 48h after media was replaced and should be filtered using 0.45μm PVDF syringe filters before proceeding for infection of target cells.

D: Generating sgRNA/Cas9 mediated stable gene knockout cell lines

General considerations: For difficult to infect cells such as primary cells, it may require concentrating lentiviral supernatant via ultracentrifugation at 24’000 – 26’000 rpm for 2h at 4°C using an ultracentrifuge with swinging bucket. Preferentially fresh lentiviral supernatant should be used for infection, but it can be frozen at -80°C for up to 1 year.


  1. Perform spinfection at 150g for 1-2h and/or overnight incubation with lentiviral supernatant in the presence of polybrene (8μg/ml) to enhance transduction efficiency with your cells of interest.
  2. Replace with fresh complete media without selective antibiotics the next day.
  3. 24-48h later replace with complete media containing selective antibiotics and culture for 5-10 days before freezing down cells at equal passages. The concentration of selective antibiotics has to be determined experimentally. Use puromycin at a range of 1-10 μg/ml or hygromycin B at 600-800μg/ml.
  4. All cell lines with different gRNA/Cas9 constructs that will be used for comparison in your study should be generated/passaged under equal conditions in parallel and equal passaging stocks should cryopreserved for later use.
  5. Before using cell lines for your study, verify knockout efficiency, either by PCR/sequencing if antibodies are not available, or perform immunoblot analysis and determine the cell lines with best knockout efficiency to be used in your study. Use at least 2-3 different sgRNA/Cas9 knockout cell lines per gene to avoid artifact issues.